This weird bird decided to dress up for the Holidays!

I’m sure Santa needs all the help he can get this time of year…
Happy Weird Bird Wednesday!
May your Holidays be filled with laughter and good cheer!

This weird bird decided to dress up for the Holidays!
I’m sure Santa needs all the help he can get this time of year…
Happy Weird Bird Wednesday!
May your Holidays be filled with laughter and good cheer!
Posted in Weird Bird Wednesday
Tagged color pencils, Copic markers, creative play, drawing, Elf Bird, happy art, Happy Holidays, humor, imagination, nonsense, rubber stamps, Santa, smile, Weird Bird Wednesday, Winter
I REELED in some creative fun yesterday…
And used a few neglected art supplies (rubber stamps) to create this Clown Fish in my sketchbook:

Perhaps you remember the funny fish I previously posted on Friday’s? If not, you can find them under my art categories on the top right side of this post as FUNny Fish Fry-days!
I won’t be creating a fish every Friday but I thought it might give you a smile when I do!
Happy Fishing!
Cheers! 🙂
Posted in Art Journal, Drawing, Fish, FUNny Fish Fry-day, gelli printing, Humor, Mixed Media Collage, rubber stamps, smile, Uncategorized, Whimsical Art, Word Play
Tagged creative play, drawing, fun, funny fish Friday, imagination, paper collage, rubber stamps, sketchbook, smile, Whimsical Art, word play
I recently learned how to make handmade stamps using Adhesive Foam Sheets. I will post how I made them soon!
These are the 2 handmade stamps I used for today’s project:
And here are my results in my art journal:

I varied the colors of acrylic paints and added a little iridescent gold to the paints…
I finished it by gluing circles of gelli-printed deli paper and adding some purchased snowflake stamps:

It looks a little like a snow globe to me! I was inspired by a post I did a year ago, The Snow Fell Softly, that you can find here.
Wishing you a Fabulous Friday, Friends!! 🙂
I have always loved maple trees – their sturdy branches, autumn display, not to mention their lovely leaf shape!
I planted a Maple tree a few years ago and was recently inspired by its leaves in my yard:


To create this collage last week in my art journal:
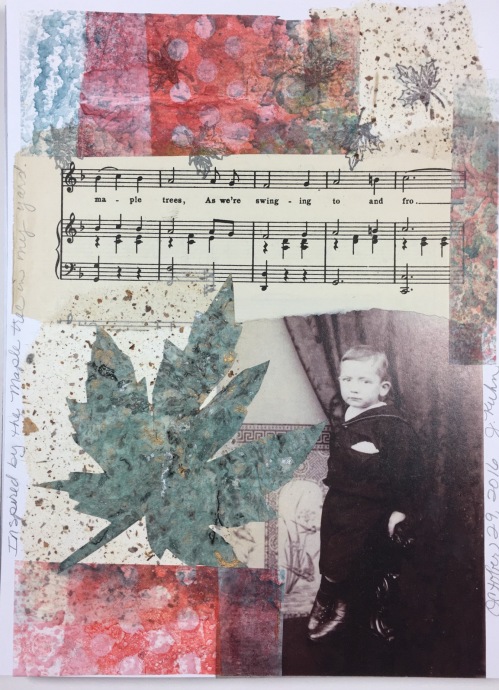
I used a copy of an old photo of someone I didn’t know, a song from a children’s songbook, my Gelli-printed deli paper, a Maple leaf rubber stamp and an actual Maple leaf to create a cut-out of a leaf with handmade marbled paper I purchased.
It looks to me like this little boy would love to be climbing a Maple tree or swinging from its branches on a swing!
Wishing you a happy day with sweet memories from your childhood! 🙂
I think it is so AMAZING how we each create art in our own style! Your art and journey is uniquely you, my friend! 🙂
I decided to add a little of my “unique” art INSIDE my art journal that I am making. I copied this doodle that I completed previously. Trimmed it to the size I wanted and glued it inside my front cover:

I added my own lettering and collage from an old dictionary. I also wanted a place to document when I started my journey in this art journal and when I will complete it.
I do believe we can add a little bit of ourselves to every journal we create! It doesn’t have to be handmade… store bought is fine too! It doesn’t have to be an ART journal, it can be any kind of journal such as a written diary. Yet, you can make it YOUR OWN by adding a little bit of you to the inside cover. (Note: I suggest the inside covers as you don’t have to show it to anyone else unless you want to!)
And the back inside cover too! Here is a quote I liked that I had in a rubber stamp:

Here are some ideas to personalize the inside covers of your journals:
I hope you give one of these ideas a try for your own journals! I’d love to hear YOUR ideas too!
Happy Creating!! 🙂
P.S. A Handmade Journal – Part 3 with be completed next week so stay tuned! 😉
Posted in Art Journal, Book Art, Drawing, Uncategorized
Tagged Art, art journal, book art, creative, doodles, drawing, experiment, fun, inspiration, paper collage, rubber stamps, unique
I have a bowl of vintage glass ornaments that remind me of Christmas past. When my hubby and I have his family to our home to celebrate Christmas Eve, I like to decorate my table with these ornaments, bells and ribbons. Add a few candles and it makes an inexpensive yet festive table!

I was thinking about these decorations when I created these three ornaments today:

My ornaments and ribbons are Gelli-printed papers I made with acrylic paints earlier this year. I like how festive this looks!
Do you have a favorite holiday ornament? I’d love to hear from you!
Happy Decorating! 😄
I started a new doodle in my sketch book recently:

My doodle reminded me of a cat I had several years ago. I named her “Sweet Pea,” because she loved to eat the sweet snap peas from my garden! 🙂
I added a few more lines and a little watercolor paint to my doodle in process:

When I was a young girl, my dad and I planted the flower, “Sweet Pea” from seeds. I will always remember the flower’s sweet scent and their beautiful colors!
This memory inspired me to create this handmade card for a sweet friend today:

And speaking of cards and sweet friends – Jodi, who has an AMAZING blog at Life in Between is starting to sell her beautiful, handmade watercolor cards at her Etsy store! You can find her store, here. I hope you will stop by her blog and Etsy shop for a visit!
Happy Creating! 🙂
Posted in Art Journal, Doodles, Handmade card
Tagged Art, art journal, card, cats, color, creative, doodles, drawing, Etsy, flowers, friends, handmade, inspiration, meditative, memories, play, rubber stamps, Sharpie black pen, Sweet Pea, watercolor
I was looking for inspiration this weekend and I discovered these wonderful paper strip collages by Darlene Maciuba-Koppel in Art Journaling Magazine by Somerset Studio. You may want to check out her blog: cinnamonpink.typepad.com
From her inspiration, I created this paper collage:

It says, “Keep your love of nature – for that is the true way to understand art.”
I started with a print I made several years ago using gelatin as a printing plate, (this was before the Gelli-Plate) and a variety of leaves, etc from the lake:

The above is a sampling of some I had made. I decided to choose the one on the right and cut into strips using a paper cutter.
I used Matte Medium to glue my painted strips to 140 lb cold press paper. In between these strips, I used pages from an old book on flowers.
I sandwiched my glued collage between wax paper and used a stack of old dictionaries to help it lie flat while it dried.
I then wrote the quote about nature I found on the internet. I added a couple of rubber stamps – a feather and a tree. I doodled the rest with a black pen – using the plants in my yard as inspiration, such as a blueberry bush:

My assistant, Jack helped me – here he is showing off for the camera:

A Daylily in bloom:

And Coral Bells – but my assistant got his tail in the way:

May you find inspiration from nature today!
Happy Creating! 🙂
Posted in Mixed Media Collage, Nature Photography
Tagged acrylic paints, Art, art journal, beauty, black micron pen, color, creative, doodles, flowers, humor, leaves, lettering, nature, paper collage, photography, play, printing, quotes, rubber stamps, trees
In 2014, I took about 20 online art classes! I wanted to Soar! And I did! I flew to new heights in my art making.
This is one of the mixed media pieces I did in Lifebook 2014:
It was fun to play with different art mediums to create it.

I tried to create a bird that looked like it was soaring high above the mountains.

I pay more attention now to birds flying in the sky…
Hope you SOAR in your creativity this week!
Happy Creating!
Posted in Mixed Media
Tagged acrylic paints, Art, birds, feathers, imaginary, maps, molding paste, nature, paper collage, play, rubber stamps, spray inks, stencils

I completed my Gelli Deli Bird Collage from yesterday. It looks like a tropical paradise to me!
I started my project by gluing random book pages to a canvas board:

Next, I added stencils with acrylic paint and rubber stamps using Royal Purple StazOn ink.

Then I glued torn bits of my own patterned paper:

I created my own stencils and cut out circles, leaves and birds from my gelli-printed deli paper and glued it down:

Repeat with more torn paper – this time I used pages from an old Shorthand book; added a little more acrylic paint and rubber stamps:

I added another layer of gelli-printed deli paper and a few more dabs of paint:
Then to finish my piece, I outlined the deli printed shapes with a black watercolor pencil, wetting it with a brush and smearing it with my finger:
And it’s complete!
I learned some of these techniques by taking an online class with Lynn Whipple, called “The Joy of Collage.”
http://www.carlasonheim.com/the-joy-of-collage-with-lynn-whipple/
Posted in Art, Bird and Flower Collages
Tagged acrylic paints, Art, birds, color, creative, flowers, Gelli-Prints, imaginary, paper collage, rubber stamps, stencils, watercolor pencils
